Category Archives: Food

Cauliflower for a crowd

Oh man, this involves a LOT of cauliflower. We were going to a potluck at the home of one of Ben’s professors, and the guest list looked like there would be 16 people there. I was to bring a “cooked vegetable,” so I bought four heads of cauliflower (8 pounds in all) and made Cauliflower with Lemon-Mustard Butter from epicurious.com.

cauli-heads.jpg cauli-leaf.jpg

This involved a much longer period spent slicing cauliflower than I expected. Cauliflower doesn’t want to be sliced, it wants to be florets. Slicing means you get some nice cross-sections and a LOT of crumbs. Oh well. I ended up doing four half sheet pans (regular cookie sheet size) and four quarter sheets, rotating them all in and out of the oven. Maybe more, it got a little hairy there at the end, and I was in some sort of Cauli-Trance.

cauli-pan.jpg

You bake the slices (and crumbs) for about 15 minutes, then baste them with the sauce—a lot of butter, lemon juice and mustard, with some zest for good measure) and bake for another 10 minute. I’m a sucker for roasted cauliflower, so I’m not the best judge because I’m not picky, but Ben kept eating the finished batches off the serving tray, so I’m pretty sure it’s a hit for people who don’t LOVE cauliflower, as well. It’s very tangy and buttery, and the leftovers (only 12 people ended up being at the party) have been tasty straight out of the fridge.

cauli-platter.jpg cauli-close-up.jpg

The other day for lunch I used up the tail end of a bag of pasta, cooking it absorption-style, and at the end I threw in a bunch of the leftover cauliflower and heated it through. That was great: The sauce melted and coated the pasta and the textures were a good match. Yum.

Quick chicken Saltimbocca

Another Bon Appetit recipe—this was an easy Chicken Saltimbocca recipe, served with a lemon pan sauce. I was slightly more successful pounding out the chicken breasts this time, though still not quite aggressive enough. Once the chicken was pounded thin, I pressed on sage leaves and covered them with a couple slices of prosciutto, then dredged the whole package in flour. The breasts cooked pretty quickly (though not as fast as if I’d gotten them thinner), and I’ve got a system down for keeping the house from getting too smoky when I pan-fry things. I close the door to the kitchen, then open the window we’ve left without a storm window and crack the back door. It wouldn’t work this week, when it’s literally 5 degrees out, but on a more temperate night the heat of the stove (esp. if the oven is on) keeps the room from getting TOO freezing.

saltim-sage.jpg saltim-prosciutto.jpg
saltim-flour.jpg saltim-pan.jpg

Then I made the pan sauce. That was a total disaster–the pan was too hot, the whole thing thickened up way too much, etc. It tasted good (nice and tangy to cut the rich prosciutto) but looked gross, so no picture!

We ate it with the carrot orzo from the same article, which was ok but not great. A bit bland, and orzo is always so slippery!

saltim-plated.jpg

Molasses cookies: Help!

Well, I made molasses cookies yesterday afternoon, and they’re very tasty but not what I want. This recipe turned out to be for the cakey sort of cookie, instead of the flat, chewy kind. Maybe it’s spice cookies I’m thinking of? Molasses-spice? I don’t know what they are called, but my mom used to make chewy cookies, quite spicy and definitely made with molasses, rolled in sugar, that flattened out a lot while they baked and cracked open so there were sugared parts and un-sugared peeks of the inside, which was very dark brown. Mom, do you still have that recipe?

The mixer was great—I scraped the sides down once, and my only problem came from not having softened the butter quite enough, so it took a while to make it stop being little lumps. One of the big advantages to the Pro is that the bowl is wider and shallower than the Artisan’s, so it’s easier to scrape the bowl down and add ingredients.

molas-ingred.jpg molas-dough.jpg molas-balls.jpg

The cookies puffed up into little mounds in the oven, and then settled down a bit, but they didn’t spread like the ones I’m thinking of:

molas-oven.jpg molas-cookies.jpg

They’re tasty, and I undercooked them a little so they’re nice and moist, and they have a good buttery flavor, but I want the other kind of recipe. Does anyone have one? I also want a good gingerbread recipe—I love not-too-sweet dark gingerbread cake. Mmmm, gingerbread.

No-Knead Bread, months late.

Back in November I was, of course, intrigued by Bittman’s article about No-Knead Bread—the entire internet seemed to be obsessed, too, and everyone was trying it and writing about it. I was concerned about the plastic Le Creuset handle in the hot oven, though, and didn’t get around to trying it until around Valentine’s day. (Pictures of my first batch, along with the steak, orzo, broccoli and wilted spinach salad we had for dinner that night, followed by fallen chocolate cakes, were lost in a camera memory card disaster.) I was tipped off to the existence of stainless steel knobs for my dutch oven on Not Martha, and I ordered one right away. Before and after:

creuset-handle.jpg creuset-stainless-handle.jpg

So handsome! Incidentally, you could just use a stainless cabinet knob from a hardware store, but I liked the idea of having the same broader handle to grab onto, since I’m a klutz. That’s also why I didn’t just plug the hole from the knob with tinfoil and slide the lid on and off; I would have gotten 3rd degree burns or a broken toe or both.

Anyway, I’ve made the bread several times since. The first batch I made using the directions Bittman gave in the printed recipe, which calls for 1 5/8 cups of water. In the video that accompanied it he said 1.5 cups. The waterier batch never rose and stayed VERY wet and sticky. I got a small loaf but it still tasted and looked good. Using 1.5 cups of water gave me much bigger and easier to handle loaves.

The dough after 18 hours of sitting, after the second rise, and after being uncovered in the oven (30 minutes into baking):

no-knead-dough.jpg no-knead-risen.jpg no-knead-oven.jpg

Everyone in the world has already commented on how good this bread is, considering how simple it is to make. All it takes is time, and a loaf costs about 55 cents, while looking and acting like good bread from a bakery. The first day it is particularly irresistible; I like it buttered (salted butter) and sprinkled with sugar. Ben is nuts about it for sandwiches. Considering that this was the second time I’d ever made bread, I was pretty damn impressed.

no-knead-loaf.jpg no-knead-sliced.jpg

My friend Laura gave us a bunch of awesome cookbooks as a wedding present, including The Bread Bible by Rose Levy Beranbaum. Now that I have the mixer (and I also got a scale this weekend) I want to experiment with a ton of the recipes in that.

Ben bakes + our new mixer

Ben has been experimenting with baking…here are the results of a joint scone effort a few weeks ago:

scones.jpg scones-and-jam.jpg

He has mastered the chocolate chip cookies he made before Christmas, and I expect an upswing in production now that we have…a mixer! Not just any mixer, either. After years of insisting I didn’t want a Kitchenaid, I did tons of research and realized that the KA Pro was probably my best bet. We went for the Professional instead of the Artisan because I want to experiment more with bread making, and I figure that in a couple years it would be annoying to have to upgrade to the bigger machine. We also both liked the design with the bowl that raises and lowers instead of the head of the machine lifting up. It also meant I didn’t have a color-picking dilemma, since the Pro comes in only a few finishes, including shiny dark green, matte pale green (too minty for me), matte copper, matte silver, and matte white. The black is gorgeous but would show every speck of flour, so I went with the silver:

ka-bowl-down.jpg ka-bowl-up.jpg
ka-closeup.jpg

Ben put it to the test as we got it home yesterday, and made banana bread according to Rachel’s mom’s recipe. It took forever to bake (at least an hour and a half, and we cranked the heat to 375 after the first hour or so) but was tasty even to my banana-loathing taste buds. It came out sort of dark, but soft and tender on the inside:

banana-bread.jpg

This afternoon I think I’ll make molasses cookies—I want to try the mixer for myself, and I have a stitch and bitch meeting tonight where cookies would be appreciated, I’m sure.

Two tarts and a brisket

Three weeks ago we had my boss, one of Ben’s professors, and two of our friends from school over for dinner. I made everything out of Sunday Suppers at Lucques, though not all from one of the dinner menus. There are tons of photos here, and it was by far my most ambitious menu so far, so I’ll break this up a bit.

Chronologically, I started the brisket the night before and then braised it all day; baked the lemon tart shell in the morning and made the curd in the afternoon, made the lentils in the late afternoon and reheated them, cooked the raddichio while we ate our main course and while everything else reheated, and made the onion tart in the afternoon, then baked it when the guests arrived.

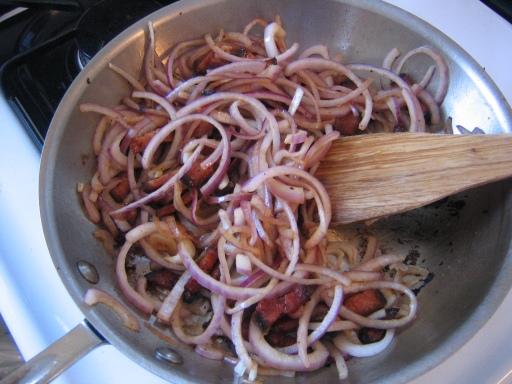
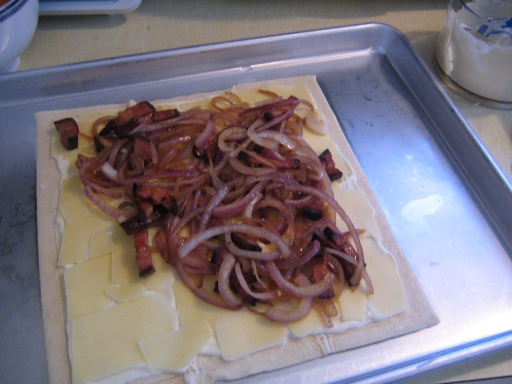
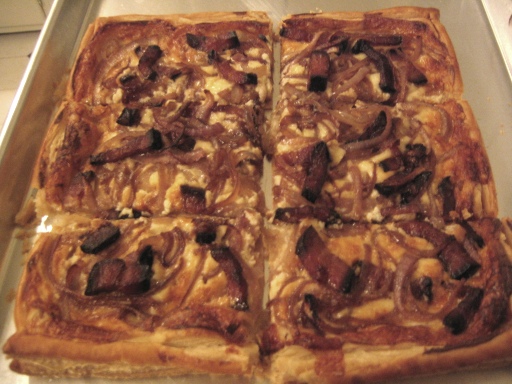
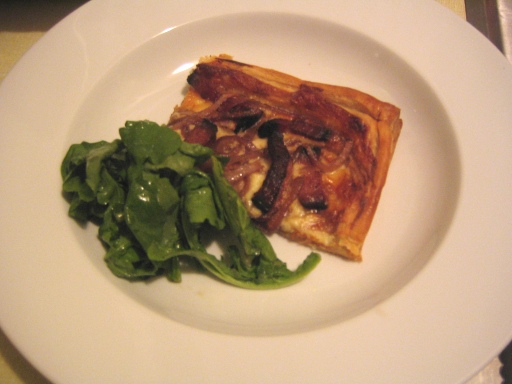
First course: Onion tart with Lardons
This is impressive and delicious but very simple. The shell is a frozen puff pastry sheet, scored around the edge so the crust will puff up.
On top of that is a layer of ricotta and creme fraiche, mixed with an egg yolk. That is topped with Comte cheese (or any gruyere, I guess), and finally a layer of lardons and red onions sauteed in the bacon fat. Hurrah!

onion-tart-topping.jpg onion-tart-raw.jpg
onion-tart-whole.jpg onion-tart-plated.jpg

It’s meant to be served with an herb salad but the Coop didn’t have enough nice looking herbs to eat them plain. I just served regular field greens.

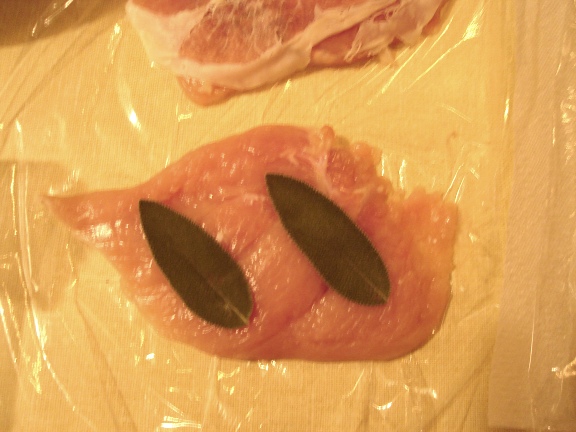
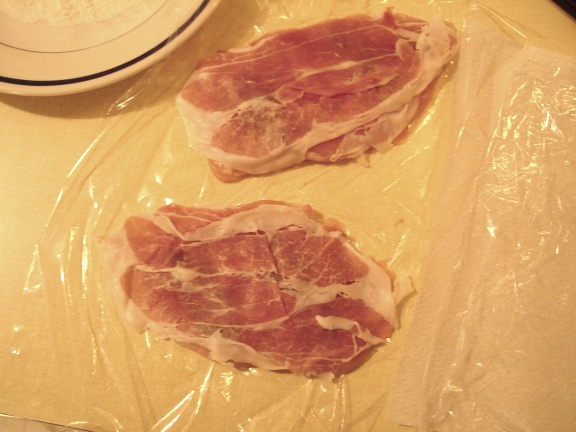
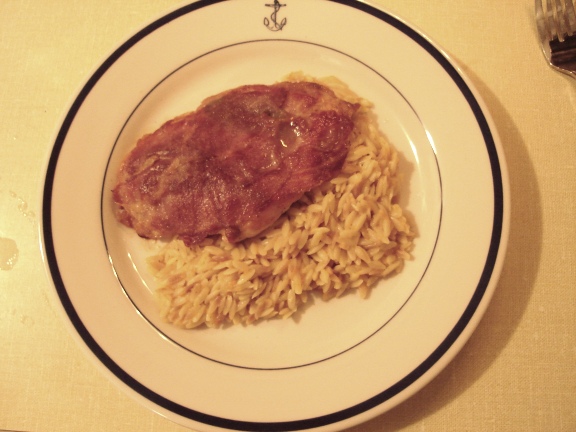
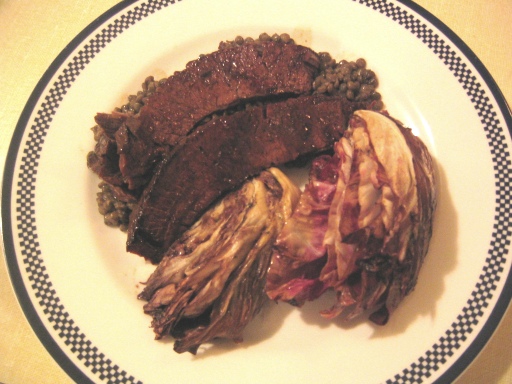
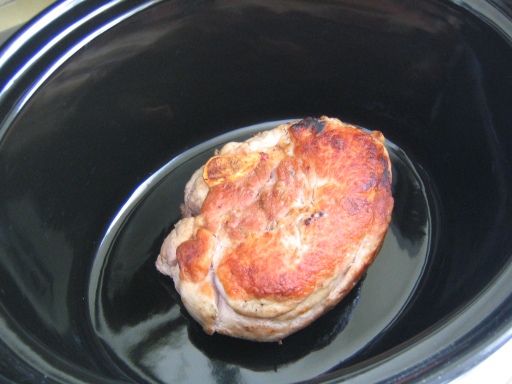
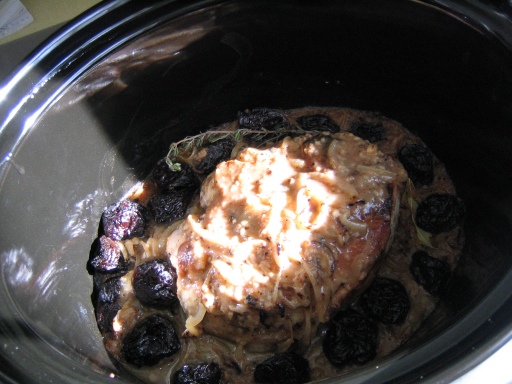
Main Course: Braised beef brisket, served with lentils and roasted raddichio
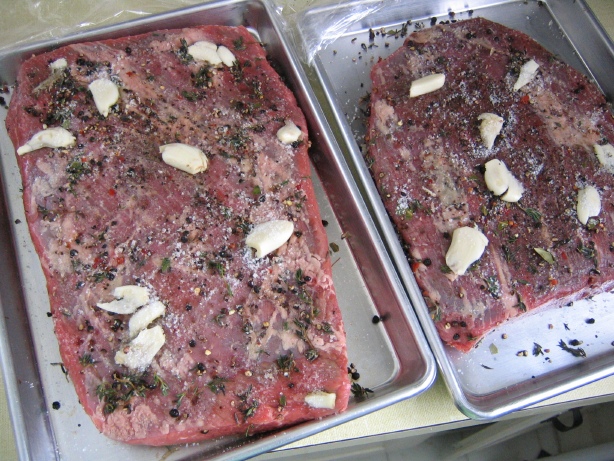
As I said above, I started the brisket the night before–Goin recommends starting two nights before and braising it a day before, since you reheat the slices anyway. I will do this next time, but this time I just didn’t have the timing in order. It gets rubbed with crumbled chilis, garlic, salt, thyme leaves and cracked pepper, then rests over night in the fridge.

brisket-raw.jpg

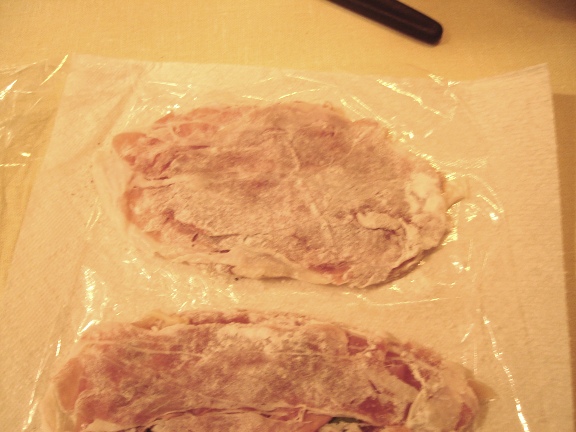
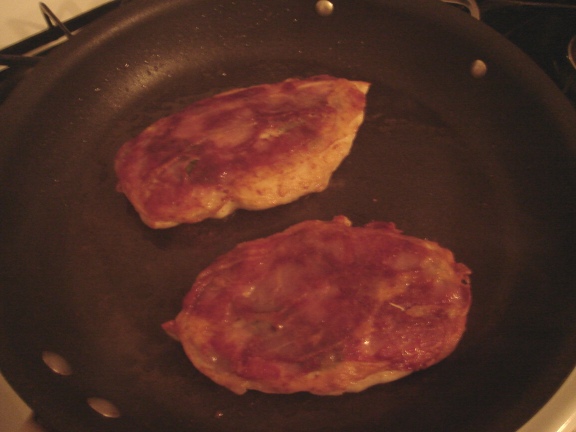
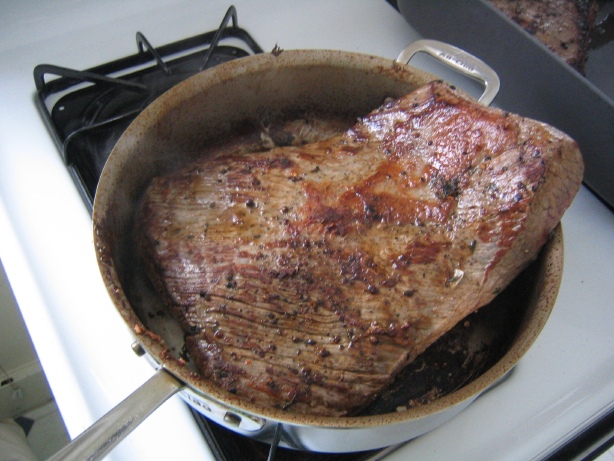
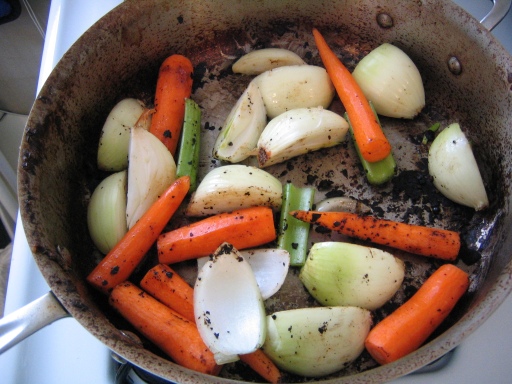
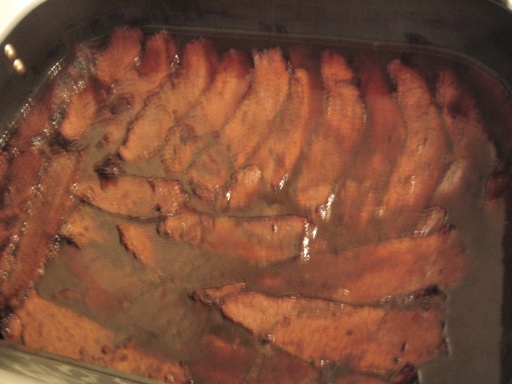
The recipe calls for a 6 pound brisket, since it’s great leftovers, and mine was closer to 6.5, in two pieces. That is a lot of meat, far more than I’ve ever cooked before. Goin is good about saying you’ll have to hang one side out while you sear the other, etc., and indeed I did have to. Then it went into the roasting pan while I cooked a ton of onions, carrots and celery, and cooked down balsamic vinegar, guinness and beef stock to make the braising liquid.

brisket-searing.jpg brisket-pan.jpg brisket-veggies.jpg

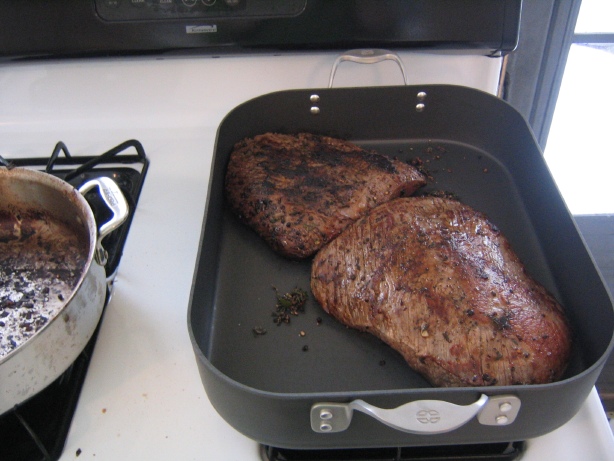
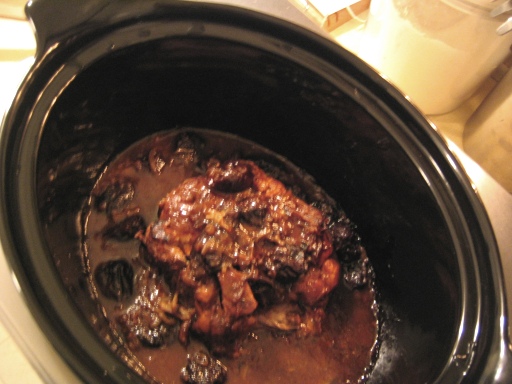
That got poured over the beef (I couldn’t quite cover it, since my pan was so big), and covered with foil–I ignored the plastic wrap instructions this time, having learned my lesson with the short ribs. Into the oven, for six hours. Once it was cooked, I pulled out the meat, chilled it so it could be sliced, strained the braising liquid, and when it was time to serve I reheated the sliced brisket in the liquid for a while. (Bad photo)

brisket-heating.jpg

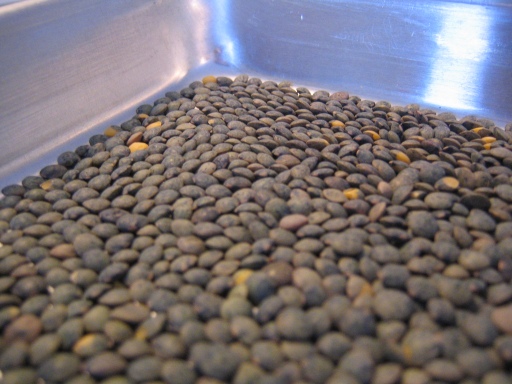
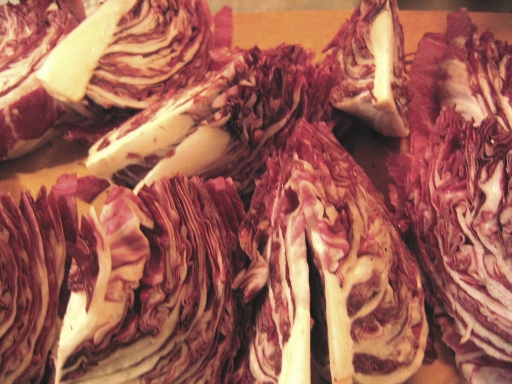
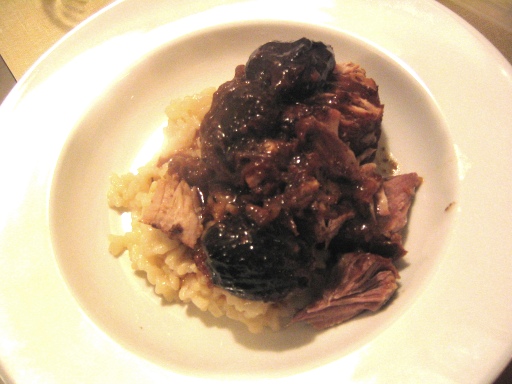
For sides I made lentils–cooked with onion, some chili flakes, etc. and roasted raddichio. I couldn’t find Raddichio Vecchio, the long narrow kind, and used the round heads. They are super super bitter, and I wasn’t a huge fan. The raw lentils and raw wedges of reddichio were pretty though:

lentils.jpg raddichio.jpg

To plate I made a long mound of lentils, put the slices of meat on top, the a few wedges of raddichio. All a big hit, but I want to try the raddichio again with the other type, or cook it longer, or maybe just do shaved brussels sprouts.

brisket-plated.jpg

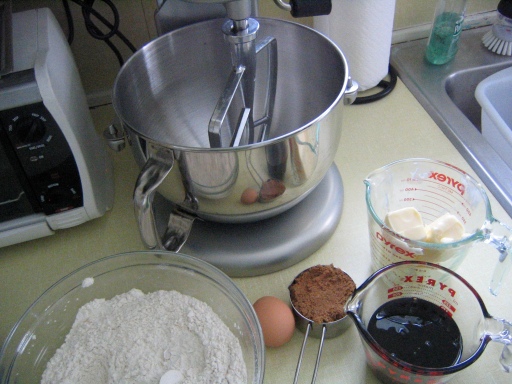
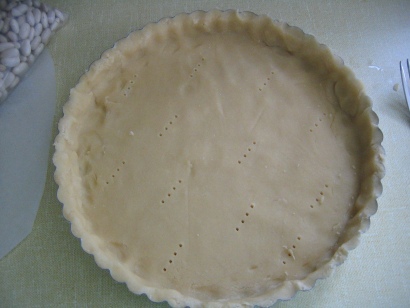
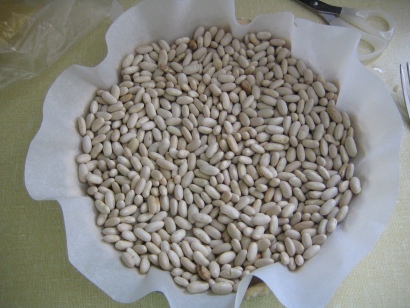
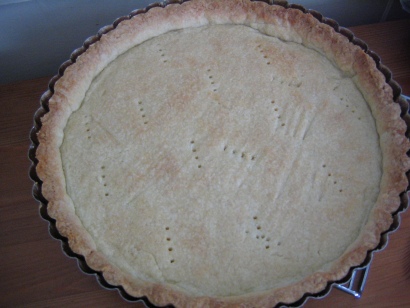
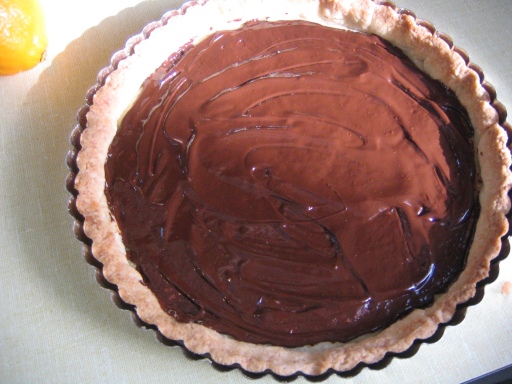
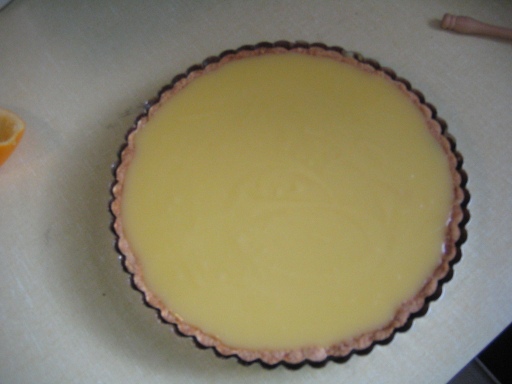
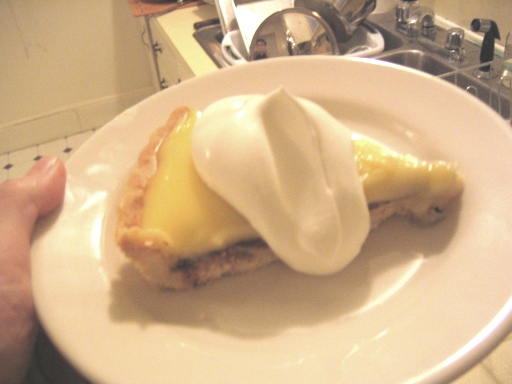
Dessert: Lemon tart with chocolate
(Entire recipe posted at link above)
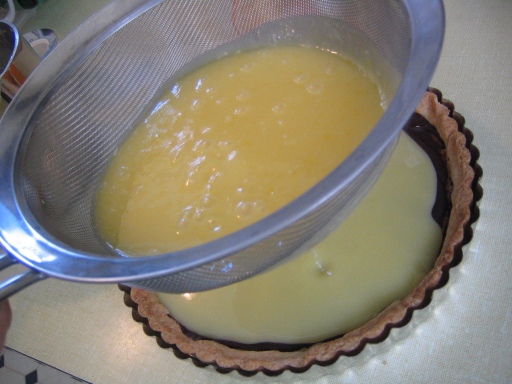
I was a little dubious about mixing lemon and chocolate, but Goin hasn’t steered me wrong (flavor-wise) yet, so I went for it. I only had one meyer lemon, and made up the rest with regular lemons. I baked the shell blind in the morning, and then covered it with the melted chocolate and made the curd.

tart-raw.jpg tart-beans.jpg
tart-baked.jpg tart-choc.jpg

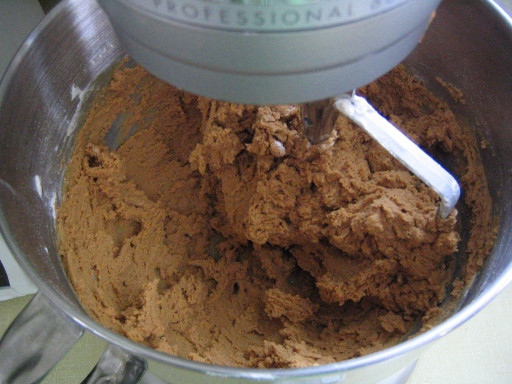
I had a little trouble telling when it was done–basically you whisk together eggs, egg yolk, sugar and lemon juice and cook it (stirring stirring stirring) until it thickens. I was jumpy about overdoing it, and instead underdid it a little–the tart set, but not as firmly as I’d have liked. The crust made a double recipe, though, so I froze the extra and made the tart again last week–much smoother this time, and I cooked it twice as long.

When the curd was cooked I took it off the heat, stirred in the butter and forgot the salt (oops), then strained the curd into the tart shell and let it set.

tart-straining.jpg tart-done.jpg

I learned a couple things at serving time:
1) My tart pan is not 10″, it’s 9. The shell was very thick, and there was a bit too much chocolate, so I really had to hack through it to slice!
2) When Ben is picking up more plates than he can carry, instead of mumbling “Please take two at a time,” I should remove the extras from his arm before he splats it onto the side of the fridge, the floor, and his pants. Hee. Particularly dramatic in this case because the curd was a little softer than normal.

tart-slice.jpg

The chocolate, by the way, is an amazing addition to the lemon curd. Somehow each balances the other–sweet/tart/acidic vs. bittersweet/creamy. It worked great.

Whew. I was in the kitchen from 9 a.m. until we ate, but it was worth it–everything came out great and I learned a lot about timing everything to get all the parts out at the right times. Whee!

Pork with Prunes

Oh dear, I am weeks behind…

Tom came over for dinner a couple weeks ago, and I knew I’d be working all day so I hauled out the slow cooker and tried a recipe from a slow cooker cookbook I was given as a shower gift. I was told to use a pork loin roast or country style ribs, about 2 pounds of either, but the Coop butcher had neither, and offered me a bone-in loin roast (or something similar). I was suspicious, because it was a rather odd-looking cut, and super super cheap (I know, the delicious slow-cooked cuts are, but….really really cheap). It turned out to be great though, very flavorful and not too lean, and I do like cooking things bone-in.

I seared the roast, then cooked a TON of floured onions until they were brown, added and cooked down some hard cider, poured it into the slow cooker, and added in a handful of prunes.

pork-seared.jpg pork-ready.jpg

After 7 hours on low the meat was completely shredding–this must be close to the cut used for pulled pork–and tender, the prunes were fat and jamlike, and the sauce was nice and thick and glossy. (Awful photos, I’m sorry.)

pork-cooked.jpg

I was low on appropriate starchy sides (new potatoes would have been good) so I fell back on risotto, as per usual.

pork-plated.jpg

I tried the Gateau Piege from Chocolate and Zucchini again, but still ran into trouble. I’m not sure what’s going wrong–last time it was undercooked, this time it split horizontally so the top and bottom separated. Weird.

An apple a day…

I still had half of a ham steak in the freezer, so I pan-fried it for dinner one night last week, and served it with roasted new potatoes and homemade apple sauce. If you’ve never made applesauce, please please give it a try next time you want some: it is SO EASY, especially if you have an immersion blender, that once you’ve tried it you will never crack a jar of Mott’s again. My mom would be the best person to give a serious recipe/instructions for people who want to actually can sauce, but I just make a cheater’s version when I want a little bit to go with pork chops, etc.

Peel and core a few apples–flavorful, not-too-tart ones like Fuji are best, and it’s nice to mix a few types together. For two of us, I used three apples, two Fuji and one Gala, and ended up with a nice bowl of leftovers. Cut up the apples and throw them in a small saucepan with a bit of water–maybe an inch? Bring the water to a boil, then reduce to a simmer and cover; cook the apples until they are quite soft.
applesauce-apples.jpg

Then pull out your immersion blender and puree the apples. Taste and see if they need sugar–if you’re using Gala, Fuji, etc, you probably won’t. Add cinnamon to taste.
applesauce.jpg

That’s it! Easy easy easy; the hardest part is peeling the apples. (Cooking the apples with their peels/cores and running the result through a foodmill is the traditional way, and it makes more flavorful sauce. But for a quick weeknight side dish, this way is simpler. Especially since I don’t have a foodmill.)

The next day I ate the leftover applesauce with Nancy’s yogurt, made right in my hometown and only recently available on the East Coast. I wish I had a digital copy of the photos of me on my first birthday, being fed yogurt and applesauce by my aunt Suzanne. My mom says I used to put away the same size bowl of it that my dad did!
Healthy and delicious:
applesauce-and-yogurt.jpg

Easy comfort food

About six months after Ben and I started dating we went very far north/east in Maine for spring break. Apparently we had missed the memo about going somewhere warm… Anyway, I was excited to get to cook, since we lived in a dorm, and I asked Ben what his favorite meal was. He said Beef Stroganoff, so I talked it over with my mom, got a recipe, and when we got to Maine I bought some nice beef, cream, a bunch of good mushrooms, etc., and made a very labor intensive stroganoff. He took a look, a bite, and said, “This is not stroganoff.” Needless to say, I was less than pleased, and I never made it for him again. It turns out he was thinking of Poor Man’s Stroganoff, which is much simpler and made with ground beef, not painstakingly cubed steak. I told him that he could eat it at home on vacations if he liked his mom’s version so much, but six years later I finally gave in and asked Christy for her recipe, which turns out to be so far beyond simple that I’m kicking myself for not making it much earlier. This is comfort food, and not glamorous, but I fed two hungry guys on a cold night, and they were both very happy. This time Ben was pleased as punch! I didn’t include mushrooms because I shopped before getting the recipe, and Ben insisted there aren’t any in it. There are supposed to be, but you chop them up very, very small.

So here you go: Christy’s Poor Man’s Stroganoff

1 lb. ground beef
1 medium onion
1/2 lb. mushrooms
8 oz. sour cream
salt & pepper to taste

Sauté the onion till soft, then add the beef, breaking it up into little sections. Stir occasionally and keep breaking the clumps of beef into smaller sections with the spoon. When completely cooked, drain off the fat, add in the mushrooms and sour cream, and heat thoroughly for a minute or two. Serve over rice or noodles.

The stirring in of the sour cream gave me pause, since it looks totally gross at that point:
poor-man-strog.jpg

But once I stirred in the cooked egg noodles things straightened out and the sour cream coated the noodles and made a nice sauce:
poor-man-strog-plated.jpg

I didn’t heat it quite long enough after adding the sour cream, but the guys ate the whole thing–a pound of meat, a pound of noodles.

A couple nights later, I fed the same two guys (Ben’s friend’s wife was out of town for a couple weeks, so we had him over a lot) a dressier pasta dish, though based on the same principles. Mark Bittman wrote in the Minimalist column in the Times a couple weeks ago about pasta with gorgonzola sauce, which sounded like an appealing and easy non-meat-based dinner. He added in halved cherry tomatoes and chopped arugula to add flavor, on the theory that both are reliable veggies in the middle of winter. Sound familiar? It’s the same pairing as the base for the parmesan-crusted chicken breasts.

This recipe was super easy and really delicious, once again the guys wolfed it down. It has the advantage of also being extremely pretty to look at.

gorgonzola-pasta.jpg

Mark Bittman’s Cheesy Pasta
From the NYTimes, 1/24/07

Salt and freshly ground black pepper
1 cup half-and-half, cream or milk
1 cup crumbled Gorgonzola or other good blue cheese
1 pound farfalle or other pasta
2 cups arugula trimmed of very thick stems, washed, dried and chopped
1 cup cherry or grape tomatoes, cut in half
Freshly grated Parmesan to taste, optional.

1. Bring a large pot of water to a boil and salt it. In a small saucepan gently warm the half-and-half and Gorgonzola just until cheese melts a bit and mixture becomes thick; chunky is O.K.

2. When water boils, cook pasta until it is just tender but not mushy. Drain and return to pot over low heat.

3. Stir in Gorgonzola sauce along with arugula, tomatoes and a healthy dose of black pepper. Stir to combine, taste and add salt, if necessary, then serve immediately, with grated Parmesan if you like.

Yield: 3 to 6 servings.

Yum, I’ll be making this again soon.

Chicken cutlets for four

Ok, in my past life (as a magazine writer in NYC) I got lots of cool stuff sent to me, since I covered design/lifestyle type issues. One of my favorite things was the pile of pre-publication proofs of books we were always getting, and I brought the best of the food-related ones with me to NH. The only one I’ve really used so far is Christopher Kimball’s The Kitchen Detective, from the editor/founder of Cook’s Illustrated. Right after we moved here I tried his Polenta Pound Cake recipe, and discovered the big flaw to using proofs of cookbooks: They haven’t gotten their final fact-check, and they’re missing stuff like page numbers, certain ingredient quantities, etc. I cooked so rarely in Brooklyn that I never noticed the gaping holes in these books! Anyway, the pound cake tipped me off, since it said to bake at 325, a very low temp for a cake like that, and it took over an hour and a half (instead of under an hour) to finally cook. Oops!

Well, non-baking recipes don’t require the same precision, and the other night I made Kimball’s “Four-Minute Chicken Cutlets” for the second time. Here’s the thing. They don’t cook in four minutes for me, because chicken seems to be my achilles heel, and I can’t get my head wrapped around preparing it. I feel stupid that I can cook pork and beef with no qualms but get all freaked out trying to get chicken ready to go… I had a really terrible time cleaning the boneless breasts and pounding them thin. I definitely didn’t get them super-thin like the recipe requires if you want them to cook in less than four minutes. I ended up on the phone with my mom, up to my elbows in chicken, completely freaking out because the breasts were tearing instead of pounding thin. Turns out I’m an idiot. Instead of slipping them in a ziplock or between saran wrap, I’d put them between PARCHMENT PAPER, meaning they couldn’t scoot around at all while I pounded them, meaning the poor things were shredded. Live and learn. I did salvage them, using my mom’s excellent advice to simply cut the breasts into smaller pieces so I could cook the thick and thin ends separately.

Anyway.

The wonderful thing about this recipe is the coating, which combines shredded parmesan with store-bought superfine breadcrumbs, to great effect. It’s a salty, flavorful, crispy coating, and makes chicken taste really savory and exciting instead of dull. Kimball’s recipe is really long (he does the CI thing and talks about how he tested all the elements of the recipe, etc.) but here’s my very short version:

For four chicken breasts (halves of big ones):
Season with salt and pepper
Dip the chicken breasts in egg white (he says 3 egg whites for this amount, I could have used two)
Dredge in 1/2 cup fine bread crumbs mixed with 3/4 cup grated parmesan
Heat 4 T olive oil until just smoking, cook the chicken 1.5-2 minutes on each side (he says to pound it to 1/4 inch. Mine was at least 1/2 inch and so took longer to cook).

Serve on a bed of arugula with sliced tomatoes over it, and some basil over the tomatoes if you want. I used cherry tomatoes, cut in half and dressed in sherry vinegar and olive oil/ salt/pepper, which added a nice juicy layer. (Cherry tomatoes tend to be pretty tasty even in the middle of winter.)

arugula-bed.jpg fried-chicken-dinner.jpg

I over-roasted my new potatoes while trying to get all the chicken cooked…ah, well.

Before the chicken we had my third version of the cauliflower soup, this time made with Broccoflower! It’s a cross between broccoli and cauliflower (….obviously), and is an amazing shade of bright spring green, not quite captured by my photo:
broccoflower.jpg
I was hoping the soup would also end up bright green, but since the inside of the broccoflower is white, the soup was very pale green. I left the cheese out this time, and just sprinkled a little on top, which made it really light and nice, a perfect first course.
brocco-soup.jpg

For dessert I made the Gateau Piège from Chocolate and Zucchini. Due to a slight clerical error in the original version of the recipe (it’s been fixed now) I underbaked it by quite a lot, so the middle was much denser and flatter than it should have been. I loved the flavor though, and it was super easy–I want to try it again this week, maybe with lemon this time.

Overall a very uplifting mid-winter meal, with lots of fresh flavors. I’ll try all of it again, hopefully with fewer bumps but a similarly tasty end product.